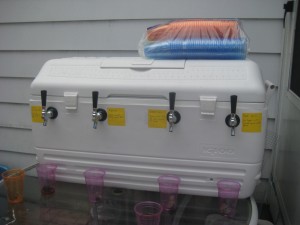
What is a jockey Box? Well, simply it is a way to take a warm keg of beer and dispense it cold. There are many versions, sizes, and materials to use to create your own Jockey Box. For the purposes of this post I’ll focus on what I’ve done to build mine. I brew a lot of beer and keg most of it, so at any give time I could have 3-8 kegs of beer on hand. For the most part, I keep 3 kegs in my Kegorator, but that is in my basement and when we have parties I don’t want people going down to my Man Cave to get a beer. The solution to my problem was a semi portable kegorator other wise known as a jockey box. A jockey box basically consists of a cooler, a number of taps, coiled line for the beer, co2 tank, ice, and keg(s) of beer.
The First step is to order all the parts you need.
- cooler, make sure it is big enough to put the number of taps on the front you want
- taps
- food grade PVC flex plastic tubing(3/16″), 25′ per tap
- 1/2″ PVC tubing, 42″ per tap
- 4-1/2″ 90deg PVC tube per tap
- 1 4way 1/2″ PVC junction per tap
- PVC glue & primer
- waterproof epoxy
- colored zip ties, 1 color for each tap
- ball lock liquid fitting 1/4″ with barb (for each keg)
- 3′ of 5/16″ I.D. gas line (for each keg)
- 5/16″ barbed swivel nut(for each keg)
- gray threaded ball lock gas disconnect
- Gas manifold (if more then 1 keg), should match number of tabs
- Dual Gauge Gas Regulator
- 5lb co2 tank
What I did to make sure I had all the right parts was to order a 4 draft system from Midwest Homebrewing Supplies. This included, Corney Kegs, Gas Regular, 4-way gas manifold, Picnic taps, and all the gas lines and connectors/clamps. I also ordered from Midwest 4 Refrigerator Tap Conversion Kits, which are basically Chrome taps with long shanks to fit though the wall of the cooler. The last thing to buy (I already had the 1/2″ PVC plumbing tubing) was 100′ of 3/16″ flex plastic tubing, which I got from MicroMatic.com. At home Depot, Lowes, or local Hardware store you can get the PVC plumbing & cement and the quick ties.
1 – prepare the holders for the 25′ of tubing.
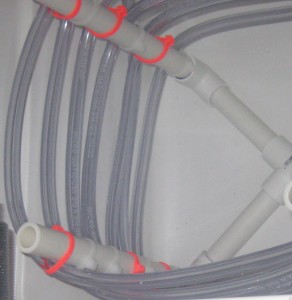
Please, read through before cutting or gluing. Repeat these steps for each holder. Cut 4 – 8″, 4 – 1.5″ sections of plumbing tubing (not the flex). Before you cut: measure the inside width of you cooler to make
sure the width of the cooler is at least 7″ * number of Taps wide. If you don’t have enough width, reduce the width of the 1.5″ sections or the number of taps. The 8″ pieces are the vertical supports, glue each vertical piece into 1 90deg elbow. With each 1.5″ piece glue it into the 4-way junction. Warning: PVC primer and glue are very toxic, use in a well ventilated area and it dries within seconds. Finally glue each elbow into the 1.5″ piece from the 4 way junction. Make sure each vertical support is perpendicular to the 4-way junction.
2 – Attach the flexible tubing to the holders
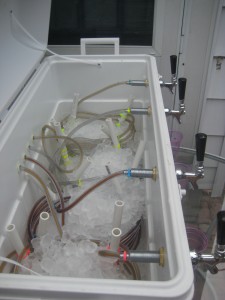
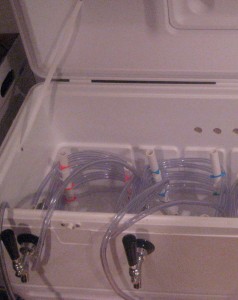
Using a 25′ length of flexible PVC tubing, starting at the bottom of the PVC holder begin wrapping the tubing around the structure, be sure to leave about a 3′ tail at the beginning/bottom (this will be the end that attaches to the keg). With each turn that gets wrapped around the holder, attach the tubing with the same color zip tie. If you have more then one tap, color coordinating them is an easy way to see what time goes where. As you approach the end, leave at least a 1′ section of tubing that will attach to the tap.
3 – Attach the taps to the cooler
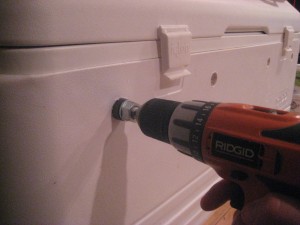
With a hole saw, cut a hole that matches the shank of you tap; in my case it was a 1″ hole. Be careful as you cut because you are going to be cutting through both plastic and insulation. Once you get you hole drilled, insert the shank for the tap in the hole and with the nut for the shank, tighten until the tap is firmly in place. Be aware, your tightening against plastic, if you go too far then you could break or damage the cooler.
4 – Make the holes for the beer line
Drill the same number of holes as you have taps in the back of the cooler that match the diameter of PVC plumbing tubing, I used a 5/8″ Forster bit for the 1/2 PVC tubing. One I got these wholes drilled, I cut lengths of PVC tubing to match the length of the hole and then epoxied the PVC tubes to the cooler. I could have used grommets with smaller holes, but that would mean leaving the tail ends of the tubing out side of the cooler when it isn’t in use. With these nice holes I can pull the tubing in and out without damaging it.
5 – attach the beer line
First attach the 1′ head of all the tubing to the tap. Boil water and let the last inch or so of the beer line sit in the hot water for a couple minutes. This will make the PVC softer so it will fit on to the barb easily. There should be a 1/4 barb at the back of the shank that is attached to the tap; attach the beer line to that barb.
Soak the end of the 3′ tail in the hot water. In the Kit I bought there were picnic taps, cut the PVC tubing from the ball lock beverage quick attachment (usually black) on the party tap. Attach the beverage quick attachment to the tail end of the 25′ beer line. This piece will attache to the out post of your keg.
6 – Attach the gas manifold
the final step is to attach the gas manifold to the back of the cooler. Simply epoxy the back of the manifold to the cooler and secure with screws. The line into the manifold will attach to the regulator which will attach to the co2 tank. Each line coming out of the manifold will attach to a keg.
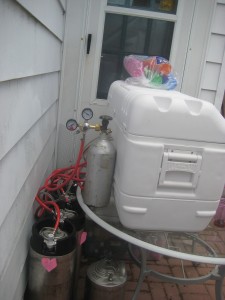
All the DIY is done. No just attach all the beer lines and gas lines to the kegs. Turn on the co2 and let the pressure balance out between the kegs and Enjoy!
Cheers!

Recent Comments